Sketch = Draw any arch. It can even be a picture of two people making an arch with their arms.
Information = two students demonstrate the structure of an arch with their arms, pushing against each other's hands. They report how it changes when their feet are farther apart or closer together.
Create = Make an arch with tagboard, figure out how to keep it from spreading out flat when weight is set on top. Paint it and the base to make it look nice and to give information about the place you imagine it to be.
Sketch = Draw the arch shape
Practice = Outline the arch shape with marker, use chalk pastel to add a thin layer of color to the background, leaving the arch white.
Create = Do the same color process on the big arch drawing from last time. Outline with marker, and then use the chalk pastels to add color to the background. Leave the arch white.
Marble Arch was designed in 1827 by John Nash as the triumphal gateway toBuckingham Palace. In 1851 the arch was moved to its current site at the northeast corner of Hyde Park.
John Nash based his design on one of these ancient Roman Designs.
Which one do you think it was?
Coliseum
Arch of Titus
Arch of Constantine
Roman Aqueduct
When the Marble Arch was built, special permission was needed to be able to walk through it to the palace. Now that it has been moved to Hyde Park, anyone can walk through it. It is a gateway from one neighborhood to another.
Create a drawing of an arched gateway.
What is the place that is through the gateway?
What are the details that will give clues about why the place on the other side of the gateway is special?
Sketch Stonehenge.
What do you remember about it?
Information Time:
Who chose to draw from the photo?
who chose to draw what they imagine it looked like when it was new?
Who chose to draw what they imagine it will look like in the future?
Who chose to draw Stonehenge in plan view?
Last time we built creations using geometric forms.
We drew them,
We included a diagram to show the parts that make the whole.
The next step in the creative process is called "Respond and Refine"
What can I do to make my drawing better?
What can you do to make your drawing better?
Why were castles built? Why is the selection of the site important? What forms, shapes and textures do you notice? What materials do you notice? How are British castles similar or different from castles in other parts of the world?
Which forms, shapes and textures will you choose for your castle?
On heavy paper, draw the oil pastel colors for your scratchboard. When your oil pastel is done, it will be dipped in black paint to turn it into scratchboard. Make sure your name is on it! It will go on the rack. The black paint needs to dry before it can be scratched.
Is there time left? Start to plan your castle design. Who is your client? Why do they want a castle? Decide on forms, shapes and textures for your castle. It does not have to look like a British castle.
Draw your castle's elevation (view from outside, looking at the front). Planning drawing stays here for next time along with scratchboard.
Use Templates on the geometric side. Do not use templates on the Organic side.
Now pick up a folded paper. Can you make it tall like a skyscraper? Can you change it so that it has a triangle footprint? A square footprint?
Draw a footprint for your skyscraper.
Add streets, gardens, parks, or anything you like to create your site plan.
If you have time, add windows or other details to your skyscraper. Do not use any glue today. Your skyscraper needs to be able to flatten to fit in your take home folder.
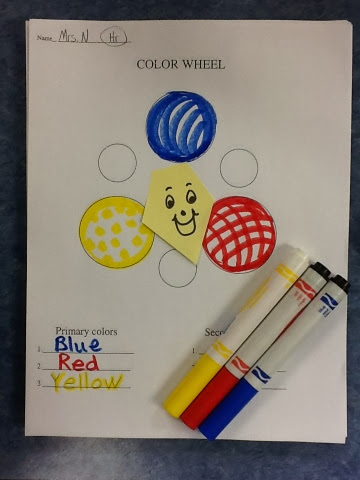
Draw Patterns in the large circles. Use a different primary color for each circle.
Write the color words at the bottom of the paper underneath the words "Primary Colors"
Look at the marker for spelling help.
Check your work. Did you use Red, Yellow and Blue? It is OK if they are in different circles, as long as you only used the large circles so far. If you made a mistake, redo your work on the back of the paper.
Find the Secondary Colors. Color the small circles in secondary colors.
Check your work. Is the green between yellow and blue? Is the purple between red and blue? Is the orange between red and yellow? If you made a mistake, cross it out and make a new small circle next to the mistake circle.
The first step is to draw the lines of the Garden Plan
Imagine Flying over a garden. What does it look like?
Does your garden have trees? Water? Bridges? Decks? Grass? Vegetables? Flowers? Sand?
Does your garden have Geometric or Organic shapes?
These pictures are plan views.
Draw a Plan View of your Garden idea. Use white and peach oil pastels on gray paper. Next time we will add more colors with paint. The paint will not stick to the oil pastel if it is thick enough.


.jpg)